Step-by-Step Guide to Installing a Canopy Awning from Top Suppliers
June 15, 2026 By admin
Step-by-Step Guide to Installing a Canopy Awning from Top Suppliers
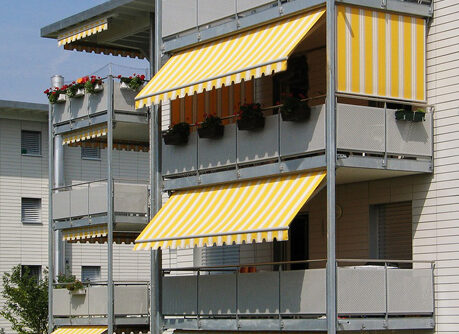
Step-by-Step Guide to Installing a Canopy Awning from Top Suppliers, which is specifically designed for protection from sun, rain, wind, or any other extreme weather conditions above the doorways, windows, Patio, or deck. Produced with a material used as a fabric that is resistant to water, winds, and other elemental forces with a metal framework, canopy awnings are available in different styles, sizes, and various colors to choose from to harmonize with the rest of the furniture and the other art pieces within the given space.
Understanding the Factors That Determine the Supplier Selection
Choosing suppliers can be very important when it comes to the installation of the awning. Here’s what to consider:
Product Selection: Select a supplier capable of providing a wide choice of awnings concerning their size, design, fabric, and customization options.
Reputation and Reviews: Search for the supplier and their reviews from the customers who bought the product they are supplying. Seek recommendations in aspects such as the quality of the product, expertise in installation, and customer care.
Warranty and Guarantees: Make sure the supplier guarantees the product warranty and warrants the work that is done on the installation.
Step-by-Step Installation Process
1. Preparation:
Gather Tools: The other tools required are a drill, a level, tape, a screwdriver, a hammer for installing anchors, and other fasteners, depending on the type of walls that are: bricks, and concrete walls, among others.
Clear the Installation Area: Any object ought to be cleared from the space marked by the awning.
Mark the Mounting Points: Again, following the brackets of the awning, draw the points to be drilled on the wall while ensuring that they are on the same level.
2. Bracket Installation:
Pre-drill the Holes: It is important to use the correct size of masonry drill bit for the material of your wall.
Install Wall Anchors: Fasten the anchors into the drilled holes in terms of the anchor manufacturer’s recommended procedure.
Mount the Brackets: Screw the brackets to the wall anchors that come with the hardware and tight till they are appropriately secure.
3. Awning Assembly (if applicable):
Manufacturer’s specifications should be used to erect the intricate framework of the car porch awning and the fabric. This might involve linking arms, installing the fabric, and affixing the canopy to the rollout gadget (if included).
4. Awning Attachment:
Lift and Position: Slowly raise the awning in a vertical position with the assistance of another person if possible, and position the arm of the awning over the mounted brackets.
Secure the Awning: Screw the awning to the brackets according to the intended hardware so that the fastening may be firm.
5. Functionality Check and Adjustments:
Operate the Awning: Check the working of the interrogative and exit mechanisms (hand wheel or electrical) if fitted.
Level and Pitch Adjustments: Adjust the awning for its level and the pitch angle according to the manufacturer’s specifications regarding drainage and use.
Conclusion
If you plan to have a canopy awning, you stand to boost considerably the appeal of the outdoor area of your house. Following the above guidelines and selecting a good supplier, you will be able to reap the advantages of a fine and practical awning for many years. Still, it is important to note that complex installations or, if still in doubt, involving an expert might be the most suitable option.
Recent Blog